The back-to-school season is approaching, but that doesn’t mean the fun has to stop! Before the hustle and bustle of school schedules take over, seize the opportunity to create lasting memories with your family through engaging DIY activities. In this interactive guide, we’ll walk you through a variety of exciting and easy-to-organize family activities that will leave everyone smiling.
Nature Scavenger Hunt
Venture into the great outdoors for a nature scavenger hunt! Craft a list of treasures like shells,colourful leaves, and unique rocks. Then, explore your backyard or the beach, embracing the thrill of discovery. Who can find the most items on the list? The winner gets to choose the next family adventure!
Art and Craft Day
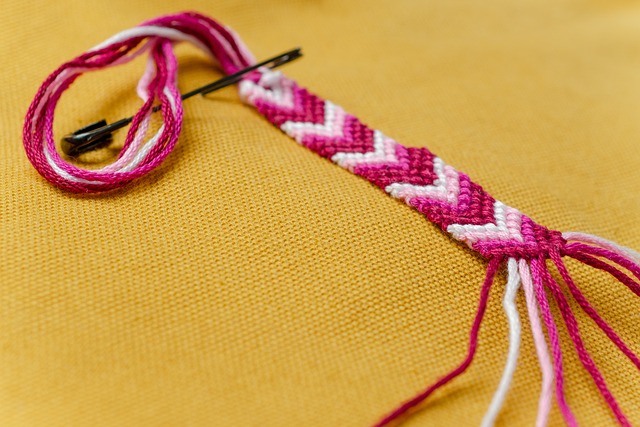
Unleash your inner artists on a dedicated art and craft day. Gather around the table armed with paints, markers, and a medley of crafting supplies. Transform ordinary rocks into miniature masterpieces, weave vibrant friendship bracelets, or collage memories onto canvas. The result? A gallery of family creativity that captures your unique talents.

Materials You’ll Need:
-
Embroidery floss in various vibrant colors
-
Scissors
-
Tape or clipboard (to hold the bracelet in place)
-
Optional: beads, charms, or other decorative elements
Steps:
-
Choose Your Colors: Select the embroidery floss colors you want to use for your bracelet. Vibrant colors work great for creating eye-catching designs.
-
Measure the Thread: Decide on the length you want for your bracelet. A common length is around 60 inches (150 cm) per thread, as you’ll be folding them in half to create the bracelet.
-
Prepare the Threads:
-
Cut the selected colors into equal lengths, usually around 60 inches each.
-
Align the threads of different colors and make sure they are of the same length.
-
Tie a knot at one end, leaving a few inches of excess thread.
-
-
Secure the Bracelet:
-
Tape the knotted end of the threads to a flat surface or use a clipboard to hold it in place. This will make it easier to create the bracelet.
-
-
Start Braiding:
-
Divide the threads into groups. A simple starting point is to use 3 threads per group.
-
Cross the right thread over the middle thread, forming a “4” shape.
-
Take the left thread and pass it over the right thread, then under the middle thread, and through the loop formed by the right thread. This is a basic braiding technique.
-
-
Add More Threads (Optional):
-
As you continue braiding, you can introduce new threads by placing them in the middle of existing threads.
-
Continue braiding the new threads along with the existing ones.
-
-
Create Patterns (Optional):
-
To create patterns, change the order of the threads as you braid.
-
For example, you could bring a thread from the rightmost group to the leftmost group, or vice versa, to create a color pattern.
-
-
Continue Braiding:
-
Keep braiding until your bracelet reaches the desired length. Remember to leave a few inches of space at the end.
-
-
Tie a Knot:
-
Once the bracelet is long enough, tie a knot at the end to secure the braided part. You can tie multiple knots for added security.
-
-
Trim Excess Thread:
-
Trim the excess thread beyond the knots. Be careful not to cut too close to the knot to prevent unraveling.
-
-
Add Decorative Elements (Optional):
-
You can add beads, charms, or other decorative elements to your bracelet.
-
Thread them onto the individual threads before you start braiding.
-
-
Tie the Bracelet:
-
To wear the bracelet, tie the two ends together around your wrist.
-
Cooking or Baking Challenge
Turn your kitchen into a culinary battleground with a cooking or baking challenge. Assign each family member a surprise ingredient – whether it’s chocolate chips or sultanas. Then, let the cooking creativity flow as you whip up unique dishes. From savoury to sweet, the meal becomes a collective masterpiece you’ll be savouring for weeks to come.
Movie Marathon
Create a cozy movie haven at home for an epic movie marathon! Choose a theme like classic comedies or magical adventures. Build a blanket fort, whip up themed snacks, and dive into cinematic worlds. It’s not just about the movies – it’s about sharing laughter, emotions, and popcorn-fueled moments. Best family movies on NETFLIX.